Showing posts with label Gear. Show all posts

Armor Part 3: Rear Bumper, Hi-Lift Mount and Jerry Can Mounts; Trasharoo

0 comments
With all of the armor on, it was time to put on some of the optional mounts.  The Hi-Lift positioning is dictated by space constraints caused by the carrier itself and the spare tire.  The Hi-Lift Handle Keeper is a must to prevent rattling and also to keep everything in place.  Here, we see the Hi-Lift and the jerry cans mounted in position.

The Trasharoo is fitted over the spare tire, which then required taking the license plate off (normally mounted in the center of the spare tire).  For this trip, I zip-tied the license plate to the Hi-Lift.  Once the license plate has its LED lights wired up, it won't be so easy to remove the license plate.  A better solution will be necessary, and with the holes on the mounting plate being as small as they are, I am not certain using male/female spade connectors will be an option.

An additional benefit of the Trasharoo was the ability to carry some firewood.  Though I loaded the roof with some extra firewood too, for a shorter trip the Trasharoo's capability of carrying wood would have done just fine.  To keep things clean, I also used a trash bag lining the inside of the Trasharoo.


Armor Part 2: 4xInnovations Front Bumper, Winch & Skid Plate

0 comments
After the rock sliders went on, the next step was to paint the other pieces of armor in preparation for installation as well.  More rattle can bedliner to the rescue!

For the front bumper, it was also the best time to install a winch.  The truck weighs approximately
4,000 lbs, so an 8,000 lbs winch would be more than sufficient.  Though there are several companies making winches these days, I decided to go with a well known, very trusted name: Warn.  The Warn M8000 fit nicely inside of the front bumper.

Under the front bumper, painted a fairly bright red is the skid plate.  No other undercarriage protection was purchased, the theory being that if I hit a rock on the skid plate, I'd back off and try a different line, rather than just keep going.  I wasn't doing anything so crazy that all of the extra weight from additional armor under the truck would be justifiable.  In fact, if it weren't for the winch, I'd likely not have wanted the extra weight of the front bumper either.

Inside the front bumpers resides a pair of KC HiLites Rally 400 4" round driving lights.  These halogen lights are likely not as bright as similar LED lights, but they are 55 watts, just like the OEM fog lights.  This meant that these lights can be wired up to the existing fog light wiring, and can still use the fog light switch on the turn signal stalk.

Unfortunately, although the holes in the bumper are advertised for 4" lights, with the mounting bracket for the Rally 400's, the lights are unable to be pointed straight forward and look a little too far down.  The fix?  I plan on installing a pair of KC HiLites Gravity LED 6" driving lights on the top of the bumper. Then I can also have the happy face light covers!


ToyTec Suspension Lift

0 comments
As seen in many pictures (such as the one on the left), the truck was getting a bit squat.  With just a hair over 100,000 miles and likely running on original shocks and springs, the suspension was in need of replacement.

After some consultation with a ToyTec representative, we decided that an off-the-shelf suspension left wouldn't work well for me because of all of the additional weight I plan to carry and the type of excursions I like to do.  He went ahead and pulled together a nice kit using several parts for the 4Runner but substituted the rear suspension for Land Cruiser springs and 4th Generation 4Runner ToyTec shocks.  The reasoning was to handle the extra weight from the roof rack, spare tire carrier, armor, sleeping platform and camping gear.

We ran into a few issues during the installation; namely, rust.  Originally a New York truck until I
drove her across the country, most of the rust was a non-issue, but some of it made working underneath the truck a bit tricky. The top of the rear shock essentially broke right off, so there was a bit of PB Blaster, some pulling, twisting and tugging to get everything off of the truck.  New shocks and springs are significantly larger.

Once on, the rear of the truck seemed sky-high, especially since the platform effectively raises the cargo loading area of the rear hatch.  Some settling has occurred since the initial installation and the truck has also been leveled by a Lexology, my local go-to shop (more on this later).

Along with the suspension lift, the front brakes were upgraded to 231mm Toyota Tundra brakes.  With larger rotors, pads, and 4-pot calipers, this is a serious upgrade for the brake system.  Since we were also installing the suspension, extended steel brake lines were also installed at the same time.  The 231mm Tundra brakes are the same as from a 2005 Tundra.  I've always felt that the brakes on the truck was a bit squishy, and these brakes will certainly help.  With more added weight coming in the form of additional armor, the timing of a new upgraded brake system could not have been better.  And finally, the finished product (I can fit my head under the fenders):


ARB Awning Installation

0 comments
One of the most enjoyable parts of any trip is being able to relax at base camp.  Mostly this means a camp fire at night and perhaps a bit of alcohol.  But on days we set up camp before the sun goes down, some shade is a nice luxury to have.  This is where the ARB Awning comes in handy.  Since the roof rack is a custom unit, a custom solution was needed for the awning.


I purchased the mid-sized 2000 model, which is so called because it is 2000mm wide (~80").  This pretty much runs the entire length of my roof.  There is also the larger 2500 model and the smaller 1250 model.  The 1250 model is interesting because it is small enough to mount to the rear of the vehicle, instead of the side.

To mount to the roof rack, I purchased a few very nice looking modular awning mounts from FourTreks.  Installation was quick and easy, though definitely a two-person job.  The website advises two mounts if you are running the 2000 or 1250 models, and three if you are running the 2500 model.  Just to be on the safe side, I ordered three; however, truth be told, now that I have received and installed them, I am convinced two is all that I need.

Both are great products, highly recommended.

Armor Part 1: 4xInnovations Rock Sliders

0 comments
Since the last off-road trip, there have been several overnight camping trips and one-day wheeling trips.  One more than a few of those trips, the lack of a lift and the low running boards meant I smacked the running boards on a few rocks.  Having the steps there is a nice luxury for daily driving, but they certainly get in the way for rock crawling.

It was clear even from the first few trips that rock sliders were absolutely necessary for the type of off-roading I enjoyed.

Along with rock sliders, there were certain other needs that I wanted to handle with some more armor.  Since the air lockers were installed, the spare tire location had to be re-dedicated to an air tank.  That meant that the spare now resided on the roof, which is no good for drag and gas mileage, and more importantly, is in a very in convenient location should I actually need to use it.  On top of all that, some of the more challenging trails proved to be a bit too much (required a friendly pull from others), and the idea of some self-recovery gear, namely a winch, would likely prove helpful in the future.

And so, a whole lot of armor was ordered, all from 4xInnovations based out of Wisconsin.  Front bumper, rock sliders, a skid plate and a rear bumper with tire carrier and optional camping table.  All to be painted and then installed soon.


First up was the rock sliders.  Since the truck is a "Limited", there are factory flares on it.  With the wider body, a decision was made to get the sliders with a kick-out at the rear.  Another option was whether to go bolt-on or weld-on.  Welding is obviously more permanent, and supposedly stronger (versus drilling holes in your frame to bolt on some sliders), so weld-on it was.  The installation took a good part of the day, since we had to paint and then weld, so there was a decent amount of downtime.

Often, folks like to powdercoat their armor for a clean, even look.  However, the problem with that is once you scratch or otherwise mess up the armor a bit, it's impossible to perfectly match your original powdercoat.  So instead, we went with rattle can bedliner.  Touch ups would be easy this way, and cheap.

With rock sliders on the truck, the look of the truck really started to change, though still quite subtle.  Once the rest of the armor goes on, it won't be so subtle anymore!

The finished product:


Switches!

0 comments
A small change with the installation of the air lockers and air compressor: switch panel is finally actually useful.

Using a metal bracket in the lower radio DIN position, a 6-switch panel is now in place.  The aluminum panel was plastidipped.  The left three will be dedicated to the compressor and two lockers, and the other three will likely go to lights, eventually.  For now they are removable blanks.

Just a small change, but an important one nonetheless.  This sets up the truck for more modifications in the near future.

On Board Air, Compressor & Lockers

0 comments

Delivered in December and finally installed.  Front and rear ARB air lockers along with an ARB air compressor and one gallon tank to round it all out.

This air set-up is exponentially faster than the small portable air compressor for inflating tires.  In fact, I can now be done inflating all four tires while friends using the portable air compressors are still working on their first one.

The air lockers haven't been tested since I've not yet gone on routes requiring them, but with winter coming to an end, the mountains and deserts will be opening up again and trips will be taken!  

Using the air compressor to activate the lockers is quite loud.  The air compressor is mounted in the engine compartment and causes a fair bit of vibration - however, engaging the lockers does not require the compressor to remain running for long.  Definitely recommend on board air for convenience sake.

Roof Rack

0 comments
Delayed update.  The truck, the dog and I have done a few more trips now.  Recently, we also had a few additions to the truck which will be discussed in another post.  Even more goodies are stuck in the garage now waiting for installation.

But for now, the one completed item is a new roof rack.  Ready for usage on longer trips where space is at a premium.  So far, there has not been a great need for it but soon we will start carrying a large propane tank for heat and cooking, which I would prefer not to keep inside the cabin.  Beyond that, space inside the truck has been sufficient to carry the dog and our gear for 2 and 3 day trips.  However, it is very likely more space will be needed soon for longer trips, especially if we included another passenger.

The rack I went with is a full-length roof rack which will allow for maximum usage of the roof.  Built by a local 4Runner enthusiast, it is low-profile and likely will be unnoticed by the untrained eye.  It includes a removable sunroof panel.  His business appears to mostly come through word of mouth, and I heard of his work through the 4Runner forum, where several local members have supported his small business.


The mesh bottom of the rack makes for a great looking rack, but also makes it difficult to install brackets for mounting other accessories.  My fingers can't fit underneath the rack, and the holes are too small to get any leverage.  I've tried a few different tricks to install brackets on the mesh, but in the end have thus far decided not to use brackets there yet.

Next, I need to buy brackets to mount the ARB awning, perhaps add a few ligths, and of course add stickers to the front wind deflectors!


Air Comes Out; Air Goes In

0 comments
Recently I bought Viair 32 Air Down Gauge to make airing down for trail runs easier.  I paired with the Viair 88P Air Compressor to air back up after the run.

The Air Down Gauge works quickly and easily.  It can be used as a normal tire gauge as well.  Screw it on, then it's easy-peasy hands-free deflation.  On my most recent trip, the deflator aired down each tire to 20 psi with the quickness.

After a trail run, the 88P Air Compressor comes in handy getting all of the tires aired up within minutes.  The air compressor is going to be a temporary solution until air lockers require getting on board air gets put in the 4Runner (hopefully in 2017).

The 88P attaches directly to the battery, which makes for more power and quicker inflation of tires.  This unit beat all of my friend's units (a Superflow unit similar to the 88p and cigarette charger compressors).

Five-stars for each new toy.  Ready to use them again, soon!

Hydrate! Hydrate! Hydrate!

0 comments
For those long runs, I bought the Amphipod RunLite 4 Hydration Belt.  Unfortunately, I ordered it right before Ironman Arizona and so was not able to use it for training.  The thought of using it during Ironman crossed my mind, but my coach cautioned against trying anything new (plus, there are aid stations at nearly every mile).  These belts might chafe for someone new to them, and the water swishing around may not be the most comfortable either.  Thus, no usage yet.

With Iron Sherpa training for a full marathon now, the hydration belt is going to become handy.  I tried it on a 5 mile run the other day with good results.  No chafing or other major issues with the belt.  With four full water bottles and a little sleeve filled with a power bar and Clif Bloks, the belt felt a bit heavy, as if I were carrying some light weights on my waist.  While this slowed my pace, it is to be expected.

The location of the water bottles can be shifted on the belt - you can also remove or add more bottles if needed.  I found it most useful to have one bottle in front and three lined up along my back.  This kept them out of the way of my legs and as I drank the water, I shifted the bottle around to keep the one I'm using in the front for easy access.

While I thought the sloshing of the water in the bottle would be a major issue, it was not.  I've carried bottles in my hand, and the water sloshing is an annoyance - you can feel the shift of the weight of the water.  However, with the hydration belt, I can hear the rhythmic sloshing, but did not feel its weight being shifted around.  Again, it was not an issue.

Towards the end of my run, I can felt lighter on my feet, no doubt due to the fact that I drank most of the water by then.  I highly recommend this item for folks starting to get into distance running and don't want to carry a water bottle in their hands.


Dispatch from Tempe: Cycle Test and Registration

0 comments
Athlete wristband
Thursday, November 15.  Woke up late. No alarm, no work, just a leisurely day with a short to-do list.  Still ended up waking at 8am Arizona time. That's 7am normal people (California) time.

On the to-do list today was a quick bike ride.  Keep the legs loose, make sure the bike is in good mechanical condition, and also test out the carbon discs borrowed from my triathlon coach.  As Iron Sherpa commented, I was downright giddy with the speed I had on those discs.  Race strategy dictates keeping the heartrate at 130bpm or below for at least the first 2 loops (of three) in order to play it safe and make sure I have some gas left for the marathon coming up.  130bpm is pretty relaxed, yet I was able to maintain an 18-20mph ride. 


Second item on the to-do list was athlete check-in.  Easy and quick, with very helpful Ironman volunteers.  Two ladies that helped me check-in were super excitable, repeat Ironman participants, and became even more excited when I told them this was my first Ironman.  As the day inches closer, I'm definitely getting excited myself. 


Then it was rest and relaxation time.  An afternoon movie and a little shopping.  Looking forward to another easy day tomorrow!

Dispatch from Tempe - Arrival on Location

0 comments
Packed full and ready to roll.
Wednesday, November 13.  Arrived in Tempe, AZ.  Time to get acclimated to the area (again).  The trip in October was a course preview trip.  This time around, we (Iron Sherpa and I) are staying at the same hotel as last time, which is of some comfort.  Not only that, but the friendly fellow at the front desk remembered me and even gave me the same room.  First floor (for easy bicycle access), and facing the parking lot (for a quieter hotel room).  We're likely here a day or two earlier than most Ironman competitors.

Earlier in the week, I met with my coach to discuss final prep details as well as weekend strategy.  More on that in another post - but basically, don't push too hard in the beginning and remember this is an endurance race.

This morning was all prep work.  This is a five day trip, so there's a lot of clothes.  Not only that, but lots of food and gear as well.  My coach lent me a pair of carbon wheels, which I am to use if the conditions allow - meaning it's not too windy. 
Carbon wheels strapped in and ready to go!
Tonight is just a night to relax.  The circus starts tomorrow - I'm planning on getting checked in early and then taking it easy for the rest of the day.  There'll be a run to the supermarket for some fresh food and water, perhaps a trip to the local triathlon shop as well.

It's funny to arrive in Arizona and lose an hour since this state does not observe daylight savings.  I'm now an hour ahead of my friends in California.

Well.  This is it.  Only a few more days until the big day.

Fluid Rolling

0 comments

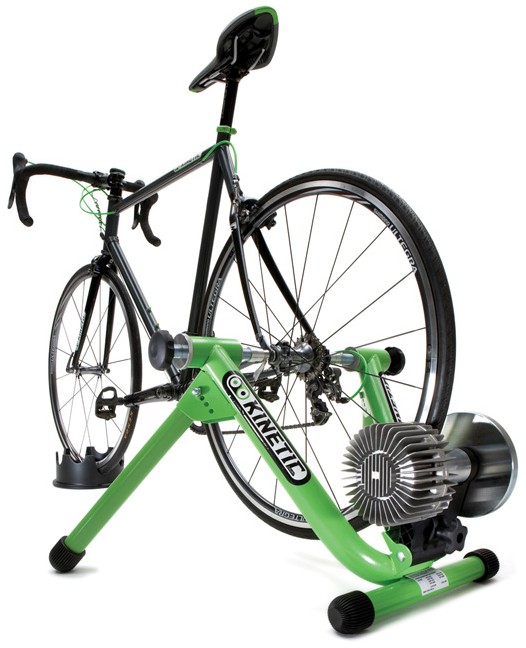
I've been using my trusty stationary roller for quite a while now.  The convenience factor for weekday morning cycling sessions is a huge benefit.  It's not the most exciting way to train (or to ride) but it certainly gets the job done.  Using the roller still gets me very sweaty, even though it's now been moved to the garage, where I keep the garage door open as I train.  But sometimes I need to do workouts with higher heart rates, and then the roller doesn't provide enough resistance to get the heart rate high enough. 

And that's where my new toy comes in, the Kinetic Road Machine Fluid Trainer.  My triathlon coach tells me he has been using his for nearly ten years, and has not had any issue with it.  I recommend getting it with the Riser Ring as it will help level your bicycle.  They also sell a non-slip mat, but I think any plain old yoga mat will do.

The fluid trainer is about three times more expensive than the stationary roller, but even after just one session on the fluid trainer, I can tell it is well worth the investment.  It is capable of providing much more resistance and allows me to sustain a high heart rate without trying to maintain an unrealistic pedal speed.  A knob at the back of the unit controls how much resistance you have, which helps with some of the training regimen.  It can help mimic a long hill and make for some really tough cycling.  The one funny thing about the fluid trainer is the fluid - actually sounds like fluid rolling around behind you.
A complaint I often read on the various review website is the noise produced from the fluid trainer.  I don't find it any louder than the stationary roller, though I have the benefit of using them in an open garage rather than in my living room.  I also listen to the radio with earphones on.  In the garage, I don't find any trouble holding a normal conversation and normal voices though.

In the end, for those triathletes and cyclists in a time crunch or who might not want to ride in inclement weather, this is the trainer to get.


More Recovery Aid

0 comments
New toy to be used in conjunction with the foam roller.  Feels great and is small enough to stash in the car for the many weekend trips I've been taking.  Iron Sherpa is an expert at packing for the trips, which requires not only normal clothes but all the training gear and related accessories too.

This thing is great - you roll it on your muscles as you see fit, and you can apply as much or as little pressure as you want.  In fact, because it's smaller, it's more versatile than the foam roller.  I'd recommend The Stick over the foam roller.  It's good for the neck, back, quads, shins, calves... you name it!


Gear! Because a Little More Carbon is Always Good

0 comments
Recently, I purchased a new pair of running shoes.  The running store folks told me to go a half size up, because the front of my toes were rubbing the front of the shoes, which may have attributed to knee pains.

Similarly, my cycling shoes are also snug around the front of my feet.  This past weekend, I did a 112 bike ride that left a few of my toenails quite tender, likely because I'm pushing up with them on the shoe. My toes also are snug to the front of the cycling shoes.  Although I'm not sure if it is related, the muscles at the back of my right knee seems to be very tight.  I figured similarly to my running shoes, I may need to upsize my cycling shoes.

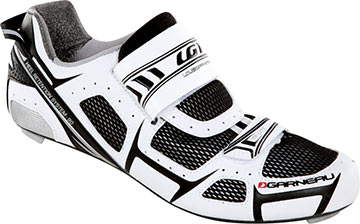
My current cycling shoes are "normal cycling" shoes, with three velcro straps.  This time around, I'm buying "triathlon" cycling shoes - made to be easier to take on and off during transition and while moving on the bicycle.

For the Louis Garneau Tri-Lite triathlon cycling shoe, that means one fat velcro strap.  Going a half size up will also provide extra room for my toes.  Another reason I chose this shoe was for extra ventilation.  Most of the top of the shoe is mesh material, unlike my current shoe which, when compared to this shoe, has limited ventilation.  Can't wait to try these on the bike.


Gear! Where the Rubber Meets the Road

0 comments
I've been long overdue for new shoes, and finally decided to go get a pair.  It's a good idea to go to a dedicated running store as the employees there always seem much more knowledgeable than the general sports stores, such as Big 5 or Sports Authority.

The employee who helped me used to run marathons fairly regularly and claimed to do upwards of one hundred miles a week.  A thin, wiry man, it seemed completely plausible and he definitely knew what he was talking about.  As it turns out, my shoes were probably too small, causing my toes to rub the front end of my shoe, which may have been the cause of my knee pains on longer runs.

Beyond that, shoes, I am told, should be replaced very three to four months, as the soles wear down and the shoes generally lose a lot of their support when the materials start getting soft.  Of course, that might advice from someone just trying to make a sale.  So I looked it up - and the advice ranges. However, all of the articles seem to agree on two things: when to replace a show (1) depending on a number of factors including running style and weight, and (2) ask five different people and you'll get five different responses.  One article stated 400-600 miles on a shoe, another put it at 300-500 miles.

Both articles say "listen to your body."  My knee pains should have been an indicator that new shoes were in order. 

brightly colored cartoon shoes
I've had these shoes for approximately a month now, and the knee pain has disappeared.  My toes aren't rubbing anymore, so no skin blisters.  All this from new shoes and going a half size up.  The new shoes are Brooks PureCadence, dark gray with lime green highlights.  I think a lot of the new shoes with multiple highlighter colors makes the running shoes look like they belong on a cartoon.  These are nice and subdued looking but with highlights for visibility, which I like.

Cartoon shoes do look nice though, but I feel like they draw a good bit of attention, and since I'm not a super fast runner, I'm not so sure I want to be drawing that much attention to myself while running!

Back to the new shoes.  They are fairly lightweight and in the totem pole of Brooks shoes, are on the lower end of support/weight.  I have tried their lightest shoes, partly because minimalist/barefoot running is so in vogue right now and I wanted to try it for myself, but never got used to it and don't think I'll be getting into that.  The first time I tried them on, I also tried on a pair of Asics.  The Asics felt like a normal shoe, whereas the Brooks felt like it was a cocoon for my foot.  I was sold.  Now that I've put in a good number of miles in them, they're broken in and feel great.  The lightness helps with cadence but still the shoe offers enough support for my feet so there are no random aches and pains.


A Spectacularly Brilliant Idea!

0 comments
Ziploc bag.  Swimming.  I am not sure how this did not occur to me earlier.  I previously had an issue with writing down notes for each swim session for all of the different sets and exercises that were scheduled.  For a while, each swim session was relatively short and the number of different sets were somewhat limited and I brought in a piece of note paper with my instructions.  Within one or two laps, the paper would be soaking wet and ink would be bleeding everywhere.  This worked for a while since I was able to remember and memorize what sets and exercises were scheduled, and even the wet ink gave me enough clues to jog my memory.  Now, however, with longer sets, more variety of sets and longer swim sessions, remembering or attempting to memorize all of my instructions became damn near impossible. 
 
Then the light bulb moment.  Use my sandwich bags, put my notes in one, and voila - waterproof notes!  No problems remembering sets and timing, no issues with wet, bleeding ink.  I never go swimming without my ziploc bag!  Now, if only I can be so good about remembering my Garmin...
 
Brilliant!

Double Duty Cap

0 comments
Here's a tidbit I nearly forgot.  Back in San Francisco, when I did the Alcatraz Challenge, we had to board a ferry that would take us to our swim start.  We jumped off the ferry and into the bay to start the swim. 

This meant we were not supposed to bring anything onto the ferry that we were not going to take with us on our swim, unless we were going to throw it away.  Between loading the ferry, getting to the start location and unloading all of the swimmers, we expected be on the ferry for an hour.  That meant in your wetsuit holding any snacks, your goggles, race cap and anything else you might want.  For me, that also meant my trusty Garmin, neoprene cap and extra latex cap. 

Why the extra latex cap and the neoprene cap?  I was told to wear an extra latex cap for a little bit of extra warmth under the neoprene cap, which helps keep the head warm.  On top of the neorpene cap goes your race cap, which is a latex cap. 

With so many pieces of gear to carry, I was afraid of dropping something or plain forgetting it. Until the brilliant idea of using my neoprene cap as a basket popped into my head, much like the proverbial lightbulb moment!  Using the chin strap as a handle, my new neoprene cap pulled double duty as a cap and as a basket, holding all of my gear plus gummi bears.

Hooray, gear!

More Protection!

0 comments
As mentioned previously, sunscreen is something I always carry and use.  I don't need Momma telling me I'm getting too dark (which even with sunscreen, she most undoubtedly will anyway).  Training for triathlons means a lot of time in the sun.  So does summer time in California.  But that's not the only kind of protection I carry these days.  

As I mentioned earlier, when donning on my wetsuit, I often get some chafing at the base of my neck.  I've found that Bodyglide Anti-Chafe Balm works wonders in that department.  I slather it all over my neck.  Rolls right on like deodorant.  With the Bodyglide, chafing is not really an issue anymore.  It's a remarkable product!


Rollin'

0 comments
After using a foam roller briefly at my brother's house, I was amazed at how great such a basic piece of foam feels.  I quickly decided that I must have one! So naturally I went and got one.  Thank goodness for Amazon.

Good for a quick massage of the back or legs. Plus you can use it for push-ups and sit-ups to make them harder.  Definitely worth the few bucks!

And check out this manual (PDF) on how to use the roller corretly (which I have yet to read)  (link last accessed August 8, 2012).